Last month I was asked to lead a workshop on making zines at an equity in education summit. It ended up that 3 other folks presented with me. The first part of the presentation ran long, so I didn’t get to share much about the actual production of zines, so here i t is.
Making a Zine
Zine making revolves around telling a story using a printed artifact. It’s a labor of love since you really aren’t likely to make money with it, but some stories need to be told no matter what…
Zine Production Steps
- Prepare for your zine making
- Write/gather content
- Create the print master (analog or digital)
- Printing
- Post-printing production (folding, assembling)
- Distributing
If you’re going to do this you have some questions to ask yourself…
What are you passionate about?
What do you feel you need to tell folks about?
What do you want to learn more about?
These are all good topics or themes for your zine.
Do you want to enlist friends and others to help?
Will your zine be a one-time publication, or are you ready to commit to a continuing effort, with issues of your zines coming out periodically?
Once you know the answers to these questions you’re ready to get started.
One note — don’t set yourself up at the beginning for a hard ride… be cautious about both the planned frequency of your zine publication and the amount of content in it. It’s better to start slow and small, and once you hit your stride you can up your game.
Write and/or Gather Your Content
Zines are made up of either original content, gathered content, or a mixture of both. Content can be written words, photographs, or drawings.
You should plan a cover page that has the zine title on it displayed in a creative and prominent manner. Your cover structure shouldn’t change too much from issue to issue so that your readers will recognize it and pick it up.
Your zine can either be focused on a single theme with changing content relevant to that topic from issue to issue. Or, you could have the theme could change from issue to issue.
In either case, you should think about the structure of the content… is page two, the inside of the front cover, always going to be short bios of your contributors? Is page three going to be your editorial content, or dedicated to a piece of art related to the zine’s theme? is your center spread always going to be your big feature article?
Are you going to have returning contributors, regular content creators? Or are you producing all the content?
In any case, you want to make something, some element of the zine, consistent from issue to issue so that your readers know what to expect… even if that something is mercurial and changing. If the content theme changes a lot, you should have the structure consistent; if the content theme is consistent from issue to issue, you can play around more with the structure of the zine.
And when we talk about content… it would be in your best interest, if you aren’t writing fiction or creating art or photography, to do your research. You want your zine to stand up to critiques… you don’t want people poking holes in your logic, your truthfulness, your knowledge of your topic.
One last note — regarding gathered content… please be mindful of others’ intellectual property rights. Don’t steal. If you quote someone or some article or reprint a photo or other artwork, please credit the creator. Or ask them for permission to repurpose their content and offer to credit them in your zine. Or better yet, ask if they want to write a new article for your zine… you never know what may happen and what new connections you will make.
Your content is ready. It’s been proofread, vetted, finalized. You are ready to get started on the production of the zine. You’re ready to build your print master.
A print master is your photocopy master, the document you will be running through the copier. It will be paginated (have a set page order) that depends on the number of total pages in your zine. It may have parts that are upside down from other parts, depending on your assembly design. Some of the making of a print master is intuitive… some isn’t.
Zines are usually folded into multi-page booklets or newsletters, rather than created as flyers. Some are simple folds, some require additional hand work to finish.
Here are two examples of how zines — and their print masters — are made.
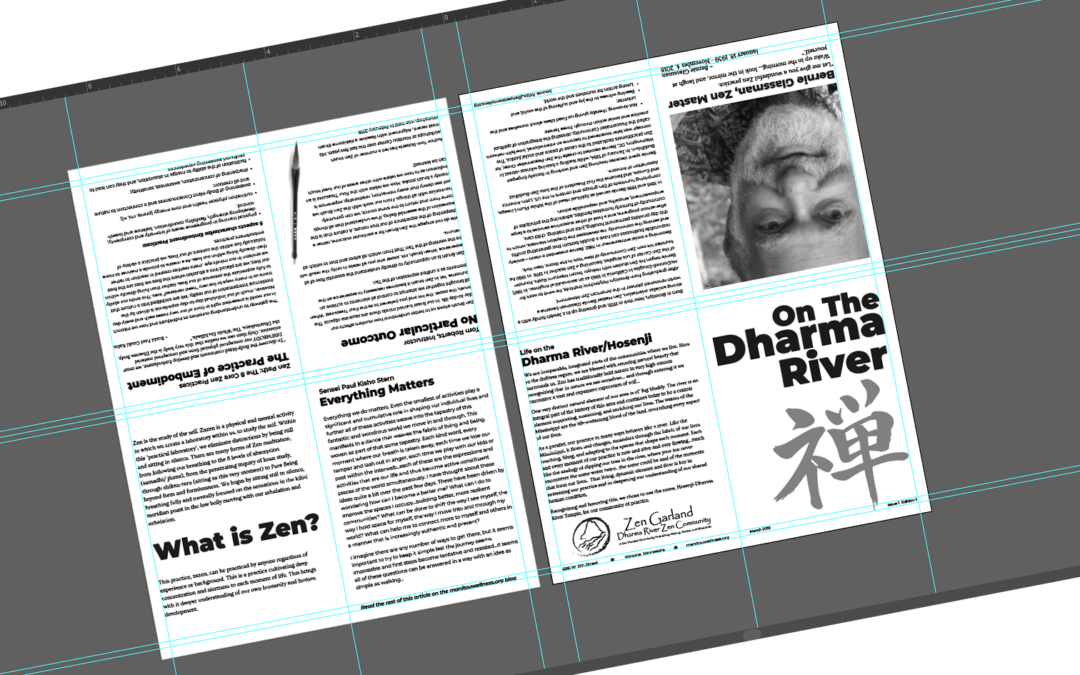
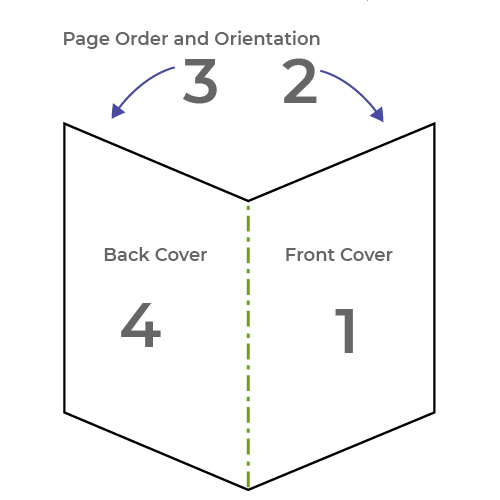
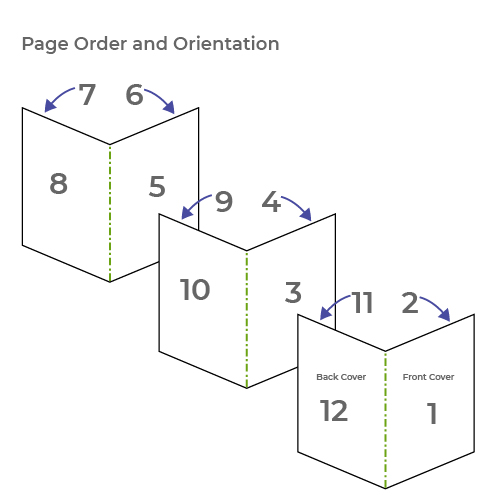
Folio (folding in half)
This is the easiest format to use. If you’re using a word-processor it’s quite straightforward to set the software to do two columns and print out ready for photocopying. The page numbering in the diagram to the right is for a one-sheet zine.
If you want to do a zine that has more than 4 pages you will need to attach multiple sheets together.
Note that the order of pages is not what you are likely to expect, especially if you haven’t done this before. It can get even more confusing when you put multiple pages together.
Each additional sheet of paper adds 4 more pages to this zine format.
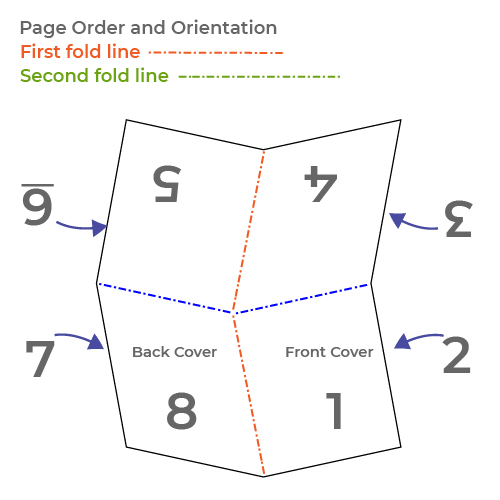
Quarto (folding into quarters)
This method may require some physical cutting and pasting to make your print master since some of the pages (pgs. 3, 4, 5, 6) are upside-down relative to the others. You can’t do this easily with a computer without desktop publishing software.
Zines made this way will need the top edge trimmed to free up the pages for reading.
If your zine is hand-lettered or hand-drawn, this format can work quite well for you.
Once zines are printed you will need to fold them in half lengthwise, then fold them in half widthwise. After zine is folded, the top edge is trimmed off. This frees up the inner 4 pages of the zine. You will probably want to staple or somehow otherwise connect the inner pages with the outer pages before distributing the zines.

Printing Your Zine
Photocopiers
Photocopiers are a primary tool for zine-making. They are relatively inexpensive to use and give reasonably good results. Most photocopiers will do two-sided printing, but you may need to do some experimenting to make sure your pagination is correct if your print master includes pages which are upside-down relative to the others.
Many photocopiers do not copy all the way to the edge of the page, and some have quirks about the way they photocopy different shades/colors, so it’s a good idea to try a print-run out once or twice and see if you can get it looking good, before you do your full run of zine pages. It’s generally a safe practice to allow ¼” on all outer edges for the copier margin.
One additional thing to consider when photocopying – if you are using photographs in your zine you will need to make sure the images have enough contrast when in black & white (unless you are copying in color of course). A good test of a photo is to take a photo of your image with your cellphone and switch it to b&w. If it still looks good, you will likely get decent results with a photocopier. Image quality will be considerably less in the photocopies.
Computer printers
If you have a computer and a printer at home then it can be easy to print things out yourself, especially if you’re not doing many copies.
However, it can get expensive. Printer ink/toner, especially inkjet cartridges, can be quite expensive, and if you have any pages with large amounts of black/color on them, you’ll be using up printer ink/toner faster than normal document printing.
It’s also difficult – if your printer doesn’t do double-sided printing – to easily create zine pages for the folio or quarto folded zines. There will be a lot of trial and error in getting your pages printed correctly.
Getting them printed
You can get your zine printed for you at businesses all over the world.
If you’re getting to the point where you’re making a lot of copies, then it may be cheaper and easier to get the zines printed. It will likely get you more uniform results than photocopying your zine pages.
Printing companies can vary a lot when it comes to pricing, so make sure you ask around for different prices. They can also vary in helpfulness, and this can be quite important. A small friendly company may be more inclined to spend time talking to you and making sure they get it right.
Make sure they do small print runs, and that small print runs mean 50 copies rather than 5,000.
If you are willing to do your own hand page collation, folding, and stapling you may be able to save a considerable amount on the printing
You don’t need to pick a local printer (although kudos to you if you do!). Many online printers ship for a cost that is included in the price or is inexpensive.
As an example – Office Depot/Office Max photocopying costs approximately $0.09/side for 8×11, B&W copies (as of 2/14/19).
Post-printing Production
Cutting the pages
If you’re making a large number of zines then you’re probably going to be doing a lot of cutting, either to separate the pages or to trim edges. It can get a bit tedious and slow to do it all with scissors. Some copy shops have paper cutters you can use, or you can get a small one starting at around $30.
Compiling multiple sheets into a zine
Not attaching pages together
Some people create multi-page zines where the pages are not attached to each other, and generally that can work OK. It’s certainly easier, but the zine is in danger of falling apart.
Stapling
Stapling it yourself is easy to do and inexpensive. You might find that a normal stapler may not-reach to the middle of your page and you will need to use a long-arm stapler. Your library or school might have one you can use if you ask (bring your own staples).
If you’re doing zines with more than about 20 or pages, you may need to use a heavy-duty stapler.
Stitching/binding/tying/fastening
You can make holes (often 3 or 5 holes is good) down the spine of the page and use ordinary needle and thread to bind the pages together. For example, if you make three holes, you would create a kind of tight figure-of-eight loop through the holes. This can bind things very nicely.
You can use a hole-punch to make one, or two, holes through the pages, and then tie a loop of string through to connect the pages. Don’t make the loop too tight or no-one will be able to turn the pages properly.
You can also use paper fasteners with hole-punched paper. They are inexpensive (.01-.02 each) and easy to use.
Getting Your Zine Out There
Once you’ve gone to all the work of creating your zine you will want to get it in the hands of people who will be interested in it. There are a number of ways to do this.
The easiest way is to find locations to leave your zines at — coffee shops or bistros, libraries, community centers, food coops, special interest retail establishments (preferably ones that your zine theme is relevant for their patrons).
Friends and family can be enlisted to pass them out. If you are a student, be aware that you may need permission to pass them out at school.
Once you have a readership built up you may want to offer to mail your readers the zines so that they don’t have to worry about missing an issue. You will need to have a way to gather mailing addresses, and you will probably want to ask them to provide some money to cover the cost of mailing the zines to them. If you’ve built up a dedicated bunch of readers, this isn’t as far-fetched as you might think.
There are actual zine distributors — called zine distros. Some are online distributors, some accept hardcopies of your zine. They can be single distribution centers, or aggregate services, that provide a way for readers to find any zines on topics of interest to them. Each distro has its own submission policy and you should research their preferred genres and arrangements (and costs) if you are interested in distributing zines in this manner.
You can also turn your zine into an e-zine using a platform such as issuu.com or other online publishing tools. Some have free options and some do not. In most cases they require a pdf file of your zine. To use Issuu, for example, you upload your zine and the Issuu tool creates a flipbook of your zine.
Recent Comments